
Zink Metals Process: How We Create Filigree Jewelry Designs

Filigree design is a meticulous art that involves the intricate manipulation of thin metal strips, skillfully woven and twisted to create captivating textures and intricate details. The process of crafting filigree jewelry by hand is methodical and time-consuming, beginning with the careful stretching of metal into delicate, threadlike strips. This step demands great patience and remains a cherished practice among jewelry artisans, who employ their skilled hands to create these intricate elements.
History of Filigree
Archaeologists unearthed the earliest known fossilized examples of filigree in ancient Greece and Mesopotamia, dating back more than 5,000 years. The term "filigree" derives from the Latin words "filum," meaning thread, and "granum," meaning grain, which aptly describes the delicate metal strips utilized in its creation.
In addition to its popularity among the Romans, the art of filigree also found its way to Russia, where it became a cherished craft. The practice of filigree in Russia can be traced back to the 12th century. Russian filigree techniques developed unique characteristics that set them apart from other regions.
Russian filigree craftsmanship became renowned for its exceptional attention to detail, precise soldering, and the skillful combination of filigree work with gemstone settings. This distinctive style attracted admiration and gained international recognition, making Russian filigree a highly sought-after art form.
Russian filigree is the technique I use in my designs for Zink Metals, including my Large Circle Filigree Necklace and Small Circle Filigree Necklace.
Filigree Technique
The process of creating filigree jewelry involves 3 main processes, each entailing several individual steps to create my finished piece. The 3 processes to create filigree jewelry include:
- Creating the Filigree Wire
- Creating the Filigree Solder
- Creating Each Individual Filigree Jewelry Piece
Process 1: Creating the Filigree Wire
The process I use to create the filigree wire includes 7 steps, which we’ll discuss in more detail below.
- Prepare the Wire
- Twist the Wire
- Anneal the Wire
- Repeat the Twisting and Annealing Process
- Flatten the Wire
- Final Annealing
- Incorporate into the Filigree Design
1. Preparing the Wire
The first step in the filigree process is to prepare the wire. I work with fine silver wire because it has a higher melting temperature and because its softness is helpful in the long run when making the filigree designs. For my filigree jewelry, I primarily use wire that has been folded over and twisted together, which takes several passes.
I start by preparing approximately four feet of 26-gauge round fine silver wire. This provides ample wire to ensure I have enough to create the intricate design. Next, I fold the wire in half, creating a double strand.
2. Twisting the Wire
Using a hand crank drill, I carefully rotate the silver wire while keeping the wire taut. The wire starts out as “soft” and easy to form and then gets work hardened, which can be easily broken if I’m not careful. It’s important to stop the twisting before the wire breaks. To achieve the desired twisted effect, I make several passes, gradually increasing the level of twist with each pass.

3. Annealing the Wire
The process of annealing helps improve the working properties of the metal to soften it for the next steps. It involves heating it to a “subcritical” temperature (1100° F) and then cooling it to room temperature up to 70%. I use the flame to anneal the twisted wire, making it soft and pliable without melting it. After annealing, the wire is ready for further twisting.
4. Repeating the Twisting and Annealing Process
Now that my silver wire is annealed, I return to the hand crank drill and resume twisting the wire to enhance the level of tightness of the twist.I then repeat the alternating process of shaping and annealing until the wire is tightly twisted.
5. Flattening the Wire
After the annealing and twisting process, I take the tightly twisted wire to the rolling mill. Then I pass the wire through the rolling mill to flatten it out so it's ready to be shaped into my desired pattern.
 |
 |
6. Final Annealing
Now it’s time for the final annealing process. I perform one last annealing to maintain the wire's softness and workability.
7. Incorporate into the Filigree Design
The final step in creating the wire is to create the design for my filigree jewelry piece. The twisted, flattened, and annealed wire is now ready to be incorporated into the filigree pattern. The next step is to create the solder.
Process 2: Creating the Filigree Solder
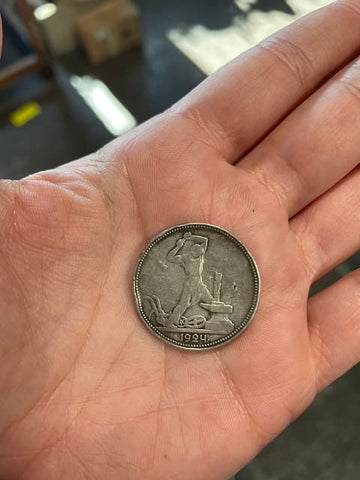
I was taught how to make filigree using the Russian technique, whose solder recipe requires the use of a specific Russian 50 Kopeks silver coin from the years of 1924-1926, and shows the picture of a blacksmith hammering on an anvil. This coin has the proper metal makeup to create the ideal solder.
The following are the steps I take to create the filigree solder:
- Roll and Cut the Coin
- Melt the Coin with Copper
- Shape and Collecting the Solder
- Mix with Borax for Flux
1. Roll the Coin
The first step in soldering the piece is to roll the previously mentioned Russian silver coin to make it thinner and more malleable. After rolling, I then cut the coin into smaller pieces to allow it to more easily be melted together with the other part of the solder.
2. Melt the Coin with Copper
After I cut the silver coin into smaller pieces, I then combine the cut pieces with 2.5 grams of copper. I melt the coin and copper mixture together until they fuse into a nugget form.

3. Shape and Collect the Solder
To better be able to create the solder, I use a vise and clamp the nugget into it. I then use a coarse file on the nugget to create shavings, and then collect the metal shavings.
4. Mix with Borax for Flux
The final step of creating the solder is to take the metal shavings collected from the filing of the solder nugget and mix them with 20-Mule Team Borax from the laundry section of the grocery store. Borax acts as a flux, ensuring the cleanliness of the metal pieces during the heating process and promotes proper adhesion.
Process 3: Creating Each Individual Filigree Jewelry Piece
At this point in the process, I begin creating each unique filigree jewelry piece using the following steps:
- Gluing Down Easily Burnable Backing
- Creating the Frame
- Designing the Filigree
- Cutting and Fitting the Wire
- Securing the Wire
- Finalizing the Filigree Jewelry Design
- Soldering the Piece Together
- Finishing the Piece of Jewelry
1. Gluing Down Easily Burnable Backing
The first step in the actual filigree jewelry piece creation is to set up an easily burnable backing. I do this by using a special glue and rolling paper used for smoking tobacco, I glue down the rolling paper onto a small piece of manilla folder. The idea is that you want to use glue and a backing that will burn off as cleanly as possible.
2. Creating the Frame
After getting the backing ready, I then glue down what will be the frame of the piece to the rolling paper. Recently I’ve been using steel pieces from different-shaped tubing.
3. Designing the Filigree
Next is where each piece's unique qualities shine through. I utilize two types of tweezers to lay out the fine silver wire design inside the frame. One is a thin and sharp pair, and the other is a structurally strong pair with small tips. Using the strong pair, I form bends, curves, and loops in the wire.

4. Cutting and Fitting the Wire
It’s important to avoid leaving any open ends of the wire to prevent catching and snagging, so I employ special super flush wire cutters to cut the wire for a clean look. I gently place each formed piece of wire within the frame, checking for fit and ensuring as many contact points as possible.

5. Securing the Wire
I secure the wire in place by applying a small amount of the special glue to hold the wires in place after fitting each piece.
6. Finalizing the Filigree Jewelry Design
In the final stage of filigree jewelry design, I add to the design until I deem it complete. Lastly, I set the piece aside to dry completely.
7. Soldering the Piece Together
The next step is soldering the frame to the filigree piece. Using a propane torch with a bushy flame, I gently heat the piece to a soldering temperature, which burns off the rolling paper and glue. Then I gently heat the piece until the solder flows. At this point, it will start to look shiny, but I need to be careful to not let it get red hot as it could melt the piece. After flipping it over to make sure to “pull” the solder through to the other side, I place the piece in a heated pickle solution to clean up the surface.
8. Finishing the Piece of Jewelry
Now we’re at the final step in finishing the filigree jewelry piece. After everything is soldered together, I attach all the parts together needed to make the jewelry wearable. This may include a necklace chain or earring stud and any other piece needed to attach those items that wasn’t already soldered in the previous steps. Then I put the finishing touches on the piece by cleaning up the fine silver filigree with a brush and pumice powder, applying a patina on the steel to blacken it, and finally applying a wax seal to the final product.
With all the intricate details incorporated in each piece, it’s clear that each filigree jewelry creation is as unique as the next with its own distinct filigree design.

The Art of Zink Metals Filigree Jewelry
Filigree jewelry design is a meticulous art that involves the intricate manipulation of thin metal strips, skillfully woven and twisted to create captivating textures and intricate details. I hope you enjoyed learning about the journey I take when creating Zink Metals’ unique filigree jewelry.